Thursday, December 15, 2011

How to Build an Earthen Oven

Ok, so I'm going to start describing how I built my first Earthen Oven. Well, technically my second, the first one I built here in my backyard and learned a great big lesson:

Don't try and rush your earth oven in the middle of August in Charleston, SC when the materials are wet as well as the air. Your oven will collapse. :-)  

But lets move on...ah hum...

I learned how to build an earth oven from Kiko Denzer's 'how-to' book, as well as other people's blogs and websites, so I figured I might as well share my experience so others can learn from my experience...the good and the bad.  Natural Building is a great style of building to experiment with on your own b/c there's really no high tech, expensive tools involved, the materials are hopefully free or cheap, and once you understand the materials and how to work with them, you can get very creative.  

The oven I'll be mostly discussing will be the oven which was built at two separate workshops: 
Workshop 1 - 2 days; Oven is built (thermal layer and insulation layer)
Workshop 2 - 1 day; Plaster layer and pizza cooking

After Workshop 1


After Workshop 2


The foundation was built during the week before the first workshop by me and my friend Elder Carlie Towne.  She is an elder in the Gullah/Geechee Nation.  This is her property and her vision is to eventually have a Gullah/Geechee Camp Meeting Center; a place to discuss and understand this culture of African descendants, people who are dedicated to understanding their roots and preserving their heritage.  The emergence of the earth oven is to allow us to start using the property, engage with the locals in Cross, SC, and bring this practice of Natural Building into rural South Carolina all the way down to the Charleston Low-Country.  

The design of the cultural center was taken on as pro-bono work by myself and four other fellow Architects here in Charleston and supported by Architecture for Humanity.

I hope that my rendition of 'How to Build Your Own Earthen Oven' is informative to those wishing to try it out! Please feel free to comment or ask questions!

I'll get started with the building of the Foundation in my next post.

Wednesday, December 14, 2011

300 Years of Fossil Fuels in 300 Seconds

I recently came across this great 5 min. animation which breaks down the world's reliance on fossil fuels in a quick, easy to understand video; the video was produced by The Post Carbon Institute.

Check out how we got to where we are and what we can do; it's time for CHANGE!

Click here for the link:


Natural Building is a form of building which is not reliant on fossil fuels.

The building elements are composed of earthen materials as well as salvaged/recycled items.

Natural Building results in beautiful, organic, sculptural structures and finishes.


Tuesday, November 29, 2011

Earthen Oven Roasted Turkey with Brown Sugar/Mustard Glaze

*For the full Earthen Oven Thanksgiving story, visit this blog*

Ingredients
1 Turkey, cleaned and pat dry
olive oil
1 bunch fresh sage
1 bunch fresh rosemary
Twine
1/2 cup Brown Sugar (packed)
1/4 cup Spicy Brown Mustard
Tin Foil
Roasting Pan


Arrange turkey breast side up in roasting pan or alternative (we used a metal grate on top of a baking pan).  Grease bird all over with olive oil.
Pour 3 cups water into pan.
Stuff  sage and rosemary into turkey.
Tie legs and wings together with twine.
Cover with tin foil and roast in Earthen Oven (or conventional oven) door closed at approx. 350 for 30 min. In the meantime, mix Brown Sugar and Mustard together in a bowl.
After 30 min, remove, check temp, glaze, rotate 180 degrees, recover with foil, and put back in.
Continue to glaze and rotate every 30 min. until meat thermometer reads 160. Remove, keep covered and turkey will rise to 165 on it's own.
Our turkey was 11 lbs and took approx. 1 hr. 15 min.
If you prefer a crispier skin, remove foil during last 30 min.
Enjoy!
Turkey after only 30 min

Prepped bird, ready to roast


Earthen Oven Turkey after full cook time (probably a bit too long)http://www.dirtqueenarchitect.blogspot.com/2011/11/earth-oven-thanksgivingand-deep-fried.html

An Earth Oven Thanksgiving....(and deep fried pumpkin pie)

Now that we have this Earth Oven in our backyard, and Thanksgiving is one of the few cool weather/bug free times of the year here in Charleston, we decided it was the perfect year to host Thanksgiving at our house.  So both sides of our family came from Virginia and North Carolina, as well as some South Carolina family and friends...all total 20-25 people!  I knew there would be tons of yummy foods...and some interesting ones too... and so here begins this tale of gluttony and goodness which we get to selfishly enjoy once a year!

WEDNESDAY
We decided we better fire up the oven on Wednesday night and go ahead and knock some things out before company arrives later that night. We lit the oven around 6pm and got the fire real nice and hot and let it burn for the next 2 hours.  I had decided to make a cake called The Hobo Cake which is a spice cake made in a cast iron skillet and cooked over fire or in an earth oven; this was going to be a surprise birthday cake for my mom and Matt's mom's birthdays.  I killed the fire and let the oven cool a little, but my impatient self threw the cake in when the oven was still WAY too hot! We closed the door and started sniffing the sweet smelling goodness cooking. After only 9 min. I decided to check on it; I pulled it out and it was black as tar and smoking!!!  Completely black!  
Lesson #1: Never underestimate the Earth Oven's capability to hold heat, hot heat....for a long, long time. 

 Moving on....

We all dug into the middle of the burnt cake (I'm very sad I have no pictures to show) and decided it was pretty damn good as long as you didn't get a really big burnt chunk. We let the oven cool down more, and then I threw in 2 loaves of wheat bread I had made earlier in the week.  Once again...too hot! There's a definite learning curve to the Earth Oven.  They seemed to brown on the outside faster than the inside could cook.
(look back at my previous post for bread baking)
Lesson #2:  See Lesson #1.

After patiently waiting for over an hour since initially killing the fire, we threw in Jake's 2 home made pumpkin pies, which cooked up beautifully in about 20 min!  I think we were finally at a good baking temp.

Earth Oven Pumpkin Pie
Lastly, we threw in raw chestnuts to roast....YUM!  This was my first chestnut experience!

At the end of the night we filled the oven with semi-damp wood and closed the door as to dry out the wood and help retain heat for the morning cooking.


THURSDAY
firing oven
The next morning we lit the fire around 11am.  The wood was surprisingly dry from spending the night in the oven, and the oven still very warm. The fire lit right up instantly and began to burn hot and clean.  After only an hour we decided it was time to have some pizza appetizers!  I rolled out a thin dough, which cooks up best in about 3 min, and we enjoyed a few wood-fired pizzas, just to wet our palettes.  Mom made a pumpkin bread dough which was rising in the sun.
Pumpkin Bread and Pizza Dough


We decide that the oven needs to cool quite a bit before sticking the turkey in. So mom and I prepped the turkey (she shows me how....yik) and we leave the oven alone for about an hour with the door on; this helps the temperature equalize all over, which is good for baking and roasting.

Mom helping me prep turkey
Pizza read to cook!


Once the oven felt to be a good temp for the turkey (375), we slid it in, closed the door, and waited 30 min. to check.  After 30 min the turkey was starting to brown in just a few places already and smelled delicious! We rotated 180 and put back in (after glazing) for another 30 min.  We check again, looking even browner and better! Rotate 180, glaze, put back in.  Lucky for us, my brother Kevin shows up right after the third 30 min. interval (he can be very slow), with the meat thermometer. We checked the temp and it rose to almost 180 degrees! (it only needed to be at 160).  It was golden brown and crispy, the most beautiful turkey I've ever laid eyes on! (Recipe on blog to follow) So, it cooked for a total of an hour and a half, but I honesty believe it was done around 1 hr - 1 hr. 15 min. (11 lbs bird).  
Lesson #3: Same as 1 and 2. 

Earth Oven Roasted Turkey

Once the turkey came out, other people threw a variety of dishes into the oven to either heat up or to cook; just to name a few: eggplant casserole, mac n cheese, stuffing, vegetable medley....(drool).

Jake let up the grill and we all consumed local oysters with a buttery/spicy dipping sauce.

Grilled Local Oysters
The day was spent almost entirely outside, near the oven, eating, in the yard, under the oak, playing music, eating, laughing, at the bon fire, playing corn hole, can-on-a-stick, and eating....we all slept like babies.

Everyone digging in


FRIDAY
The day after. 
Food coma. 
There's only one way to cure a food coma: to eat again.

We decide to roll out more pizza dough as well as some Chapati dough made by Anne.

Wenny tosses dough
 Once again, the fire is easy to light and the oven gets fast quickly (in about 45 min.) due to it being the third cooking day and contains so much retained heat.
We start with normal pizzas, but then we decide to get a little crazy with the leftovers.
Kevin makes a turkey/mashed potato/gravy pizza, then there's a kale/mashed potato pizza. Then someone pulls out the eggplant casserole and it's one of the most delicious pizzas we've ever had!!!  We try for vegetable medley but it's too wet and rips the dough.  As we get hungry for something sweet we try cranberry sauce with cream cheese icing and sliced apples, then we throw a brie wheel in a skillet, pour fig jam all over it and melt it into creamy goodness!
Cranberry/Cream Cheese Apple Pizza


Turkey/Mashed Potato/Gravy Pizza


Melted Brie w/ Fig Preserves

Once we are all completely pizza'd out, Kevin and Matt decide they must re-use the gigantic cast iron skillet filled with peanut oil(i was worried about my kitchen).

These guys are turning it out....the music is blaring, the oil is popping, and the geniuses are at work.  They fry pickles (frickles) and jalapenos.  They fry mashed potatoes.   Then...the grand finale....they fry pumpkin pie bites!  But wait, that's not all....then they inject the pumpkin pie bites with home made whipped cream!!!  It's like a Thanksgiving Twinkee!!! 

Matt and Kevin's Deep Fried Pumpkin Pie w/ Injected Whipped Cream!!!

In the mean time, we wait for a 'baking ready' oven temp and bake 2 trays of mom's pumpkin bread for the morning.

After delving into the fry master's inventions, we are all completely full and content (and a bit sick feeling).  Although these 3 days were over the top, extreme, a bit unhealthy, and probably somewhat wasteful, the beauty in it all was the coming together of family and friends...to cook and to create and to eat together.  The Earth Oven definitely did it's job this year! I heard several comments such as, 'It just makes cooking fun again' and 'it completely changes the whole eating experience!'  
Lesson #4: Eat, drink, and be merry...over-indulge every now and then, sit back and laugh, and most of all, be Thankful for being able to experience this kind of a life!!!  And NEVER, underestimate the Earth Oven. 

Me, rather impatiently waiting for my turkey


Sunday, November 6, 2011

Holmes Inspection: Making Homes Right????


While mindlessly flipping through TV channels at my mother-in-law’s house the other night, I got caught by a show on HGTV called ‘Holmes Inspection.’  The featured show casts a tough looking builder guy with a crew cut and overalls, along with his trusty entourage of tight black T-shirt wearing guys with dust masks which he orders around by saying things like, ‘drop this ceiling!’ and ‘kill this stud here!’  The edition, like so many shows these days, showcased the confused homeowners with a house full of problems and no idea what to do.  So the trusty building team came to the rescue to renovate while the couple is away;  turning their problem-ridden home into the ‘healthy’ and’ safe’ home they deserve.

Mr. Hot-Shot Builder guy starts in the bathroom where I do admit, the bathtub recessed into the floor to be a bit strange, declares this to be a ‘tripping hazard!,’ and this is simply ‘unsafe!’  He stands up, dramatically bangs his hammer into the tile shower surround, and orders one of the tight black shirt crew men to ‘Take it out!.’


Mr. Holmes
 Next Scene: the fiberglass tub and tiles are ripped from the bathroom and thrown into the oversized green dumpster sitting in the driveway of the house.  Later in the show we learn that a brand new fiberglass tub and new tiles are re-installed in the exact same place!  I could never quite understand why the same perfectly good tub couldn’t be reused?  Or why all of the tiles had to be ‘dumpstered’ as well, and retiled? Or why the perfectly good tub went to the landfill to begin with???

Mr. Holmes continues to stroll through the house, prodding walls, and saying things like, ‘This probably doesn’t meet code, so let’s go ahead and tear out all of the ceilings and rebuild them!’ …..and ‘This probably DOES meet code, but let’s go ahead and pull it out anyways, just to be on the safe side.’

  
Dumpster filled with construction waste
The camera crew then shows us shot upon shot of demolition....walls and ceilings coming down all over the place….and the big green dumpster outside is filling…and filling…and filling…................

Obviously Mr. Holmes is not really in control of a real budget with real money, because most homeowners don’t like to hear things like ‘It’s probably alright but we’re going to spend $5000 of your money replacing it anyways, is that OK?’  And I suppose it never occurred to him that checking the code book really isn't rocket science, but then again this is TV and thumbing through the Building Code doesn't really make for good ratings.

While it is funny to sit back and crack jokes and poke fun at the annoying home remodeling shows (and trust me, Architects love this kind of fun ), all jokes aside, shows and messages like this are disturbing and are a disservice to all who watch it and believe in this model as an industry. The message of this show, as I saw it, was to throw away, and rebuild; just toss it all in the big ol’ dumpster that takes all of our garbage into the invisible landfill that we will never have to see again! Voila!  The decisions made were made from speculation; not knowledge.  Not once was the idea of salvaging or recycling or simply improving the house with a minimal amount of impact and waste ever entertained; not even with the perfectly good bath tub that was tossed in the big green dumpster.  

Landfill; construction waste


In the 80’s, 90’s, and early 2000’s, the building industry was flooded with cheap, fast housing; cookie cutter houses;  houses with little to no thought about materials, functionality, aesthetics, or longevity.  Investments were the focus, and faster and cheaper was better.  That was then and this is now. The year 2011; we’re knee deep into ‘Green Building’ for Pete’s sake! The construction industry produces the largest amount of landfill waste over any other industry in the United Sates.   In a world which is currently overpopulated, over-polluted, and natural resources are diminishing, we as individuals...and especially those of us who serve in the building industry have an obligation to become creative and efficient in how we deal with these situations; our decisions should be based off of research and knowledge and when we do have to demolish items, have we exhausted all options for re-use and salvaging before mindlessly tossing our fiberglass bath tubs into the dumpster???  HGTV's message of unconscious wastefulness and uneducated decision-making is influencing 78,000 people across America who are now watching this show,  I personally find this to be disturbing.  Not only do we as individuals and professionals need to take responsibility for our construction-based decisions, but our TV networks should have an obligation to think harder about the messages they are broadcasting as well.  Perhaps if these well-watched programs focused even a little on the ideas behind conservation and creative solutions and less on the wasteful practices which have been haunting us for over two decades now, then maybe a small percentage of the 78,000 people might make different decisions about their own home and their own waste; and in this inter-connected world in which we live, better decisions equals a better future for all of us and for this fragile Earth.

Typical 1950's House

Typical 1990's House


Tuesday, October 25, 2011

Earthen Oven Breads, Curried Veggies, Beans & More!!!


So, I just had my first experience, ever, really baking...like, really baking: kneading out dough, 'proofing', 'knocking-back,' and all of these other terms I had to Google.  My newly built Earthen Oven in my backyard has sparked a sudden interest in learning to bake artisan breads and other goodies.  So far, we've cooked in our oven using a live fire (like with the pizza) or hot coals burning and 'sizzling' food.  In order to bake artisan breads, you cook in your Earthen Oven in a slightly different manner which allows you to bake over a long period of time.  I decided to start with 3 loaves of bread and then used the (10 hours) of remaining retained heat to cook dinner which consisted of curried vegetables and rice.  I then followed this up with a pot of beans to slow-cook over night, much to my surprise and amazement.....the Earthen Oven strikes again with perfectly cooked, non-mushy beans! I removed these the next morning.  I'd like to share my experiences baking breads and other delicious foods in my earth oven as I experiment and eat. I'll post a few of my recipes along the way too!

Fresh Baked Hearth Bread


I used the recipe on the back of the bread flour bag left over from the pizza party.  I tripled the recipe because I figure if you're going to light up the oven, you might as well use it to it's full capacity.  Thanks to this lady on You Tube, I took my turn at kneading out the dough (she made it look a lot easier than it was).  Several sloppy attempts later, I placed the 3 balls of dough in my bowls to rise, and about an hour later I 'knocked them back' and let them rise again.  


dough after kneading
letting dough rise
At this point I went ahead and lit the fire since I knew I'd need to let it burn for 1-2 hours before having enough retained heat to bake for a while.  You're going to want to get your fire burning really HOT, to where the flames are actually shooting out of the door!  Keep stoking this fire.  I kept mine going until my dough was just about ready to go in, which ended up being about 1hr. 45 min. and it seemed to do the trick. 


dough ready to go into oven
heating up oven
hot coals spread across hearth floor
first peek at the bread!
While the oven was heating up, I 'shaped' the dough into round balls and cut an 'X' into the tops. At this point the fire was SUPER hot and I was running out of wood anyways.  I tried to hold my arm in the oven for an '8 Mississippi count', but I think I got to about 2 or 3 (arm hairs are still in tact).  At this point, I let the fire burn down to coals, and then I spread the coals out evenly over the hearth and let it sit for about 10 min.  I then used a hoe to scrape the coals out into a wheelbarrow...be careful of hot coals if you have bare feet!  Once the coals were out, I wet a cotton rag and wiped the hearth down to clean the surface.  I then put the oven door on to 'wash' the oven.  This period of time helps the hearth floor become an even temperature all over and helps regulate the temperatures inside of the oven as a whole. I decided to test the temperature to see if it was ready for breads and I threw in a handful of wheat flour.  I had read that if it browns in 10-20sec. then it's good for bread, and if it burns up fast, the oven is too hot and you should let it sit.  My flour looked good so I gave it a go!  After flouring the bakers peel and putting the first loaf on, I sprayed the top of the bread with water to add steam in the oven. (this might be unnecessary).  I popped the first loaf in, closed the door tight, and sat back and crossed my fingers.  About 20 min. later I could smell it cooking from indoors and I just couldn't take the suspense any longer.  Much to my surprise, this golden brown, beautiful round loaf was staring me in the face! I quickly got it out, as it maybe looked a little too brown, and put it on racks to cool.  I prepped the other 2 loaves and threw those in at the same time for the second round of bread baking.  I decided on this batch to turn them 180 degrees after 10 min. It seemed that the oven was not quite as hot on this go 'round, so I rotated them and decided to leave these for another 20 min.  After a total cook time of 30 min. I pulled out two lightly golden brown perfect loaves!  I waited 45 min. or so before cutting into the first loaf...crispy crunchy outside, warm soft inside. Delish!
letting bread cool


hot damn those are some golden buns!


I'll go ahead and share my bread recipe with you and then tell you how I decided to use the remaining heat in the oven.


Hearth Bread Recipe

3 1/3 cups bread flour
1/4 cup whole wheat flour
1 1/2 teaspoons salt
1 1/4 teaspoon yeast
1 1/3 cups water
1 teaspoon honey

Mix flours, salt, and yeast in large bowl. 
Stir in water and honey.
Knead dough for 8-10 min.
Place dough in oiled bowl, cover with plastic wrap, and let sit in warm place until dough doubles in size.  Place dough on floured surface and gently flatten dough.  Shape into round ball.  Cover with plastic wrap and let rise until doubled in size.  Place dough on baker's peel (floured) and slice 'X' into top of loaf.  Once oven is ready, transfer dough into oven, close door, and wait 20-30 min, or until golden brown.  Rotate 180 once half way through cooking.  Spraying dough with water prior to inserting in oven may increase steam production.

Earthen Oven Veggies, Rice & Beans...Oh My!

What to do with all of this remaining heat you ask?  Well just keep on cookin'!!!  Practically anything you have in your fridge or cabinets you can cook in the earthen oven and this will provide you with good eats for the remainder of the week.  I decided to throw together a curried vegetable dish in the cast iron pan and some rice with coconut milk.  The veggies cooked up beautifully in only about 25 min with one stirring.  The rice however, I think I'll need to keep experimenting with because it was still very watery after the 25 min.; I decided to finish it up on the stove top because I was starving!  The oven was still so hot, but being that we haven't been to the grocery store in a while, I was having trouble finding other things to cook. I ran across a bag of dried beans, which I had heard you could slow-cook in the ovens, but didn't quite buy it.  I tossed the beans in a metal pot, covered them with water, put the lid on, and then stuck it in the oven. I closed the door and decided to forget about it until the morning, completely thinking I'd wake up to either hard beans and water, or pure mush.  Around 8am the next morning, I pulled the oven door off (still hot) and pulled out the most perfectly cooked beans I'd ever seen!!! Not mushy! But crispy and well-cooked!  Looks like dinner for tonight!
curried vegetables
slow-cooked beans overnight
 So all in all....in one firing of 1 hr. 45 min. and a small bucket of scrap wood, I cooked 3 loaves of delicious bread, curried vegetables, and a pot of beans!!!  Not bad for my first try. I think next time I'll have even more dishes lined up to cook up!  Good (and healthy) eats!!!


Unlike my baking recipes, when I cook, I measure nothing.  Here's my recipe for curried vegetables:

Earthen Oven Curried Vegetables

1/2 sweet potato sliced
1 small onion sliced
4 cloves of garlic minced
3 tablespoons of ghee (indian clarified butter)
1 bunch of kale chopped
2 dried red peppers chopped
1 tablespoon of red curry paste
a pinch of sea salt
a few large shakes of curry powder
a dollop of honey

Combine all ingredients in a cast-iron pan except for the kale.  Mix.
Place in oven and close door.
Stir after approximately 15 min.
Add kale. Cook for another 10 min. or until veggies look tender and done.
Serve over coconut milk rice.

59P6UJ4WZGQ7

Monday, October 17, 2011

Earth Oven Pizza

Ever wonder what's better than pizza? EARTH OVEN PIZZA!!!
Fresh made dough, cooked in a clay oven, next to a live fire is just about one of the tastiest foods you could ever put in your mouth.  There is just so much satisfaction in eating pizza that you rolled out with your own hands and then cooked in an oven which is also made with your own two hands.   It just tastes better this way!
I recently completed an Earthen Oven in my backyard in preparation for a workshop I would be teaching later.  (my building process will be outlined in future posts) 
Shortly after completing the insulation layer, we had my 31st Birthday Pizza Party and tested out these Earth Oven Pizzas I'd read so much about.  I'd like to share our recipe for the dough (which turned out really well) and the process for cooking them.

FIRE

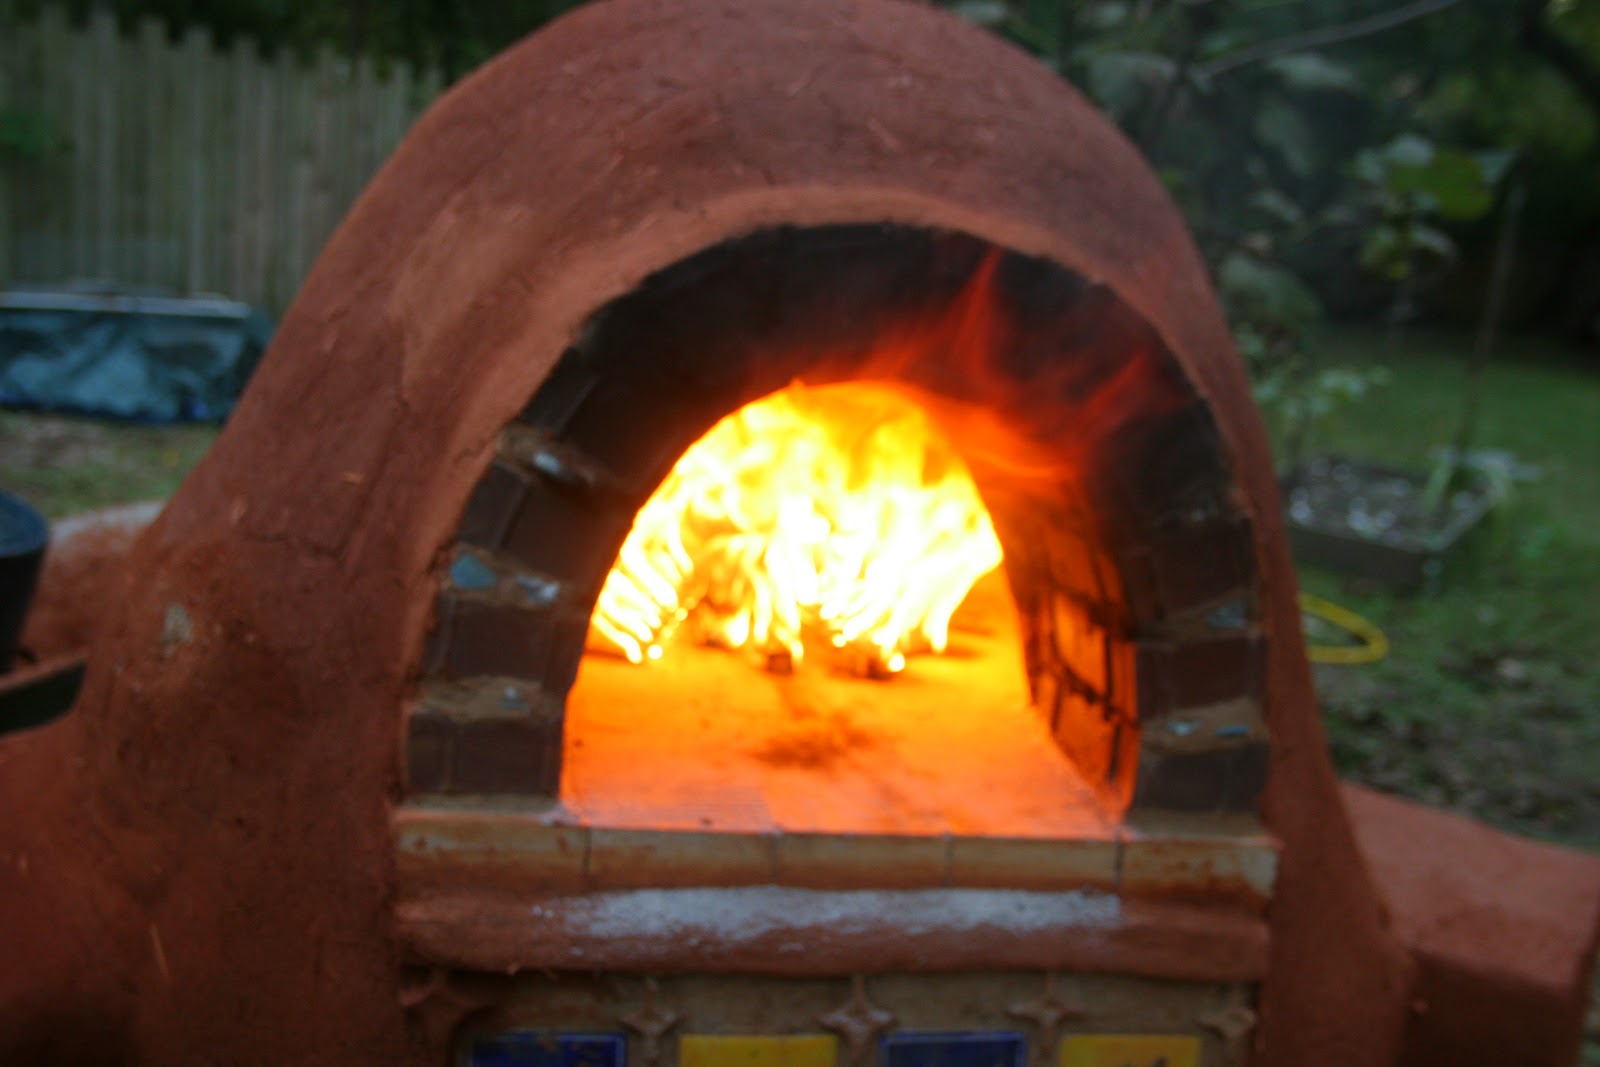
First off, get your fire going hot.
Start by using small kindling up near the oven opening and once it's burning well, push the fire back farther into the oven and continue to feed it.  Continue this process until you have a clean, well-burning fire burning towards the rear of the oven; you will start to see the flames actually curling up out of the opening.  Watch out!!!  I melted the back of my jacket while trying to warm my bum. (not cool) Keep feeding the fire for the next 45 min. - 1hr.


Once the oven is so hot inside that you can't hold your hand inside of the oven for more than a couple of seconds, and you have a nice bed of hot coals around the perimeter of the oven, you're ready to cook!

COOKING
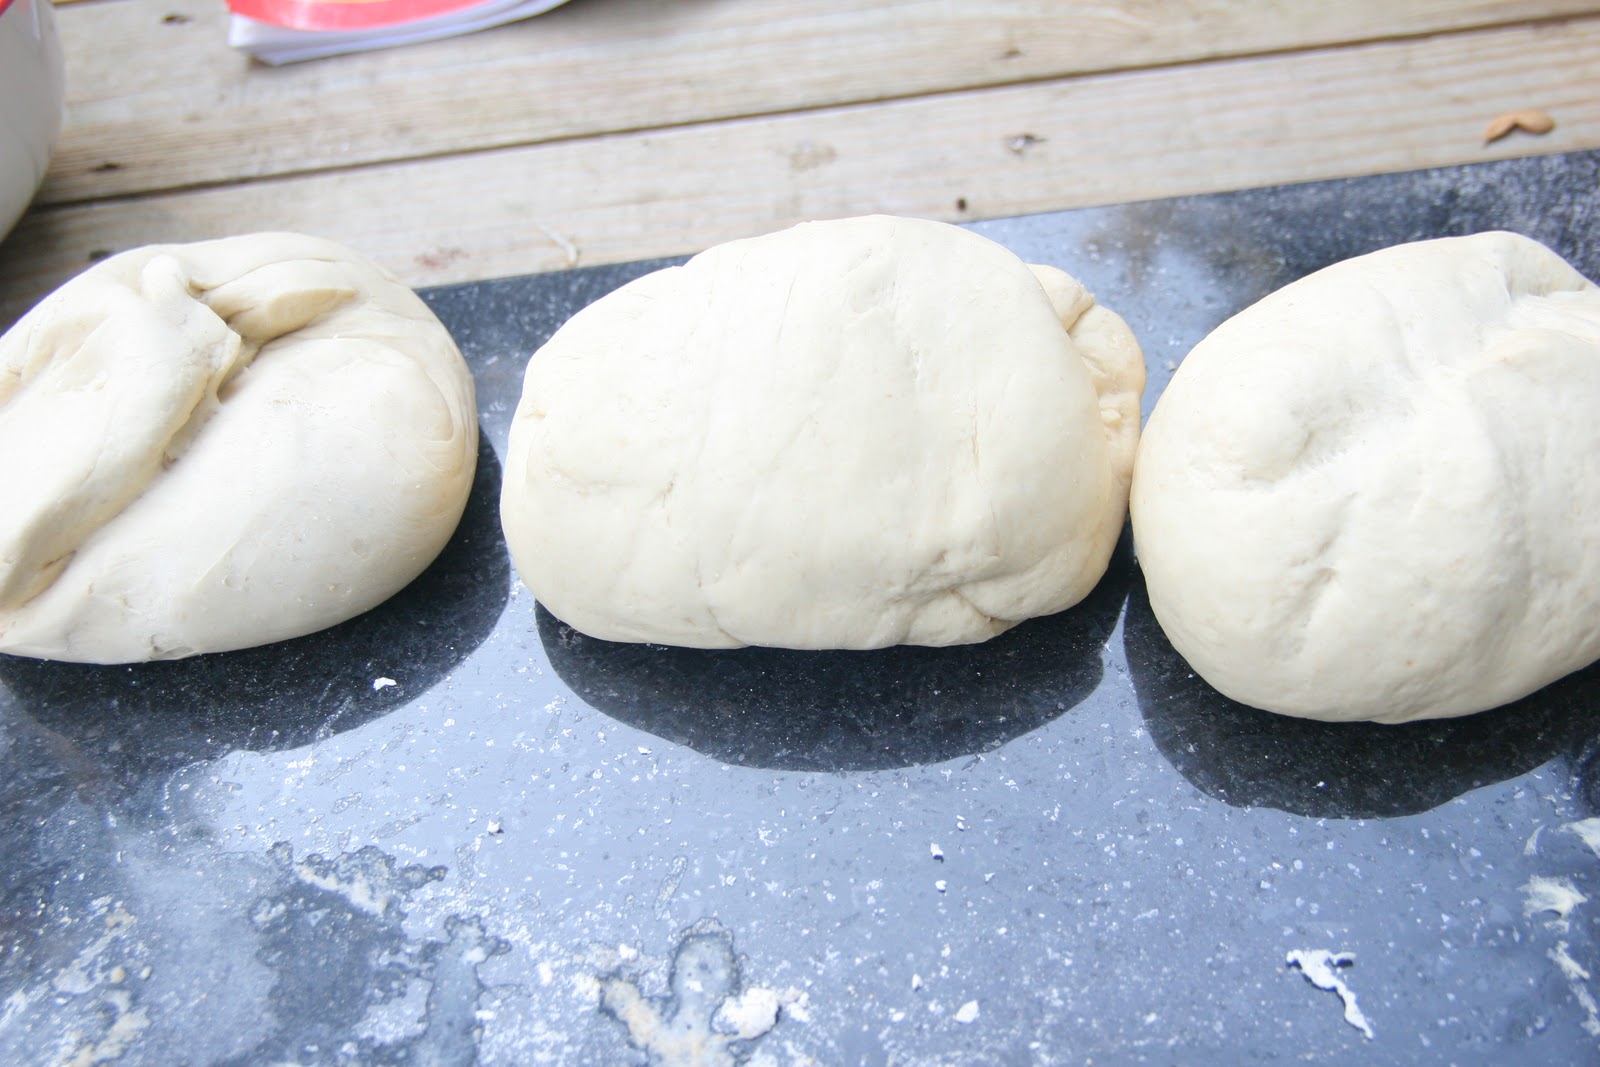
Roll out a small handful of dough on a non-stick surface.  We had an old piece of granite in our backyard which worked well for dough rolling.  Sprinkle some flour or cornmeal down to prevent sticking.  The dough should only be 1/8" - 1/4" thick once rolled out and a 10" - 12" circle makes for a good personal size pizza and easy to handle once in the oven.


Arrange your sauce, toppings, and cheese on the pizza.
Transfer the pizza onto a pizza peel; be sure to sprinkle the peel with flour or cornmeal to prevent sticking.
Stoke the fire again prior to cooking pizza; be sure you have a well-burning, hot fire going.
Slide the pizza in with the peel.  With a quick 'jab,' the pizza will slip right off of the peel and on to the hot firebrick hearth. (custom pizza peels as seen in the below picture by my partner, Matt McQueen of Handcrafted, LLC)


Instantly, you will start to see the cheese bubbling, the dough curling up, and that wonderful aroma starts to hit you in the nose!
After approx. 1 min, rotate the pizza around 180 degrees.  You could use your peel, but we found a long handle spatula or long handle tongs worked well for this rotation.
Let the pizza cook for another 1-2 min. and once it looks evenly browned around the edges and browned on top, use your spatula or peel to remove pizza from the oven. (notice in the picture below how the coals and the fire spread around the full perimeter of the oven interior vs. burning only in one spot)


Now dig in!!! Please realize that you will never think of pizza in the same way again.  :-)
You should be able to cook 3 or 4 pizzas before having to re-stoke the fire.  Continue to stoke the fire and keep a live fire going as long as you want to keep cooking.
The pizzas were a huge hit at the party and we easily fed around 35 people with no problems.
Cooking around the oven outside made for a great atmosphere and everyone fully enjoyed the experience, so much so that we had a second round of hungry pizza lovers later in the night!  Being that the oven was still so hot, we were able to add more wood and simply blow (with a narrow tube) oxygen into the rear of the oven and it lit back up instantly!


Stay tuned for more back yard oven recipes!
Send me comments or recipes of your own.

RECIPE

Here is the recipe we used for the pizza dough:

2 teaspoons of active dry yeast
2 1/4 cup warm water
2 teaspoons of sugar
1/4 cup olive oil
5 cups bread flour
1 tablespoon salt

Dissolve the yeast in warm water and let stand for 5 min.
Add sugar, oil, and flour and stir. Add salt last and stir.
Kneed dough until soft, smooth, and elastic (about 8-10 min).
Transfer the dough into a bowl and cover with plastic wrap.
Wait until the dough doubles in side and then punch down.
Cover and refrigerate or use instantly.
Remove from refrigerator about 1 hr. before using; allow to become room temperature.
(this recipe will make approx. ten personal size, thin crust pizzas)

Tuesday, October 11, 2011

What Can You Build?


Natural Building techniques can be applied to everything from a decorative finish to a full scale house.  The following are examples of Natural Building applications:  Interior and Exterior Earthen Plasters, Earthen Floors, Earthen Benches, Earthen Ovens & Cook Tops, Fireplaces & Heaters, parts of Structures or full Structures.  Natural Building techniques and applications can work in conjunction with new conventional buildings as well as renovations of existing conventional buildings.  Aesthetically, the sculptural and curving qualities of the clay create richness in color and overall ‘warmth’ which is often missing from conventional construction materials.

What Materials Can You Use?


The materials common in Natural Building are clay and sand which vary in quality and availability depending on geographic location. When mixed with water and, usually, straw or another fiber, the mixture may form cob or adobe (clay blocks). Other materials commonly used in Natural Building are: earth (as rammed earth or earth bag), wood (cordwood or timber frame/post-and-beam), straw bale, rice-hulls, bamboo and rock. A wide variety of reused or recycled materials are common in Natural Building, including urbanite (salvaged chunks of used concrete), tires, tire bales, discarded bottles and other recycled glass.

Monday, October 10, 2011

What is Natural Building?

The construction industry as a whole is the largest contributor of landfill waste, contributing 40% of the total waste each year.  New home construction comes at a tremendous expense to the planet. Building 1.7 million homes with traditional wood, steel and concrete frames consumes the same amount of energy as heating and cooling 10 million houses each year. The environmental costs stem largely from the manufacture of materials. Using natural materials that require minimal processing and refining substantially reduces environmental impacts.­

Natural building, not to be confused with ‘Green Building’ and sometimes referred to as ‘Alternative Building Methods,’ offers a way to construct a home (as well as a multitude of other items) with renewable, naturally occurring and locally available materials with a low-embodied energy, as opposed to industrial or man-made products. Many of these materials are available throughout the world and are often recycled or salvaged materials, so the costs and pollution associated with the transportation of these materials across the country falls. As a bonus, many Natural Building methods are energy efficient, inexpensive and easy to build with little technical construction knowledge. Natural building relies on human labor vs. technology, which encourages community and personal involvement during the building process.  As a result, participants gain knowledge through direct experience, participate in their community, and leave feeling empowered by designing and creating with their own two hands.  Natural Building is available to everyone, regardless of income or credit status.